Usually, when someone talks about annotating their books, my response is a horrified gasp. I was definitely taught from a young age never to write in books, and I find annotated text very difficult to parse if it’d something I am trying to read it straight through, like reading a novel. There are definitely exceptions to this, such as with textbooks, where it is more likely that I need to pick out specific information from a text multiple times and annotations make that much easier. Cookbooks are another exception. Recipes in cookbooks are never one size fits all, and often there will be changes cooks want to make to cater to their own personal tastes and preferences. It’s very common to see scribbled notes in the margins of well-used cookbooks!
But what do people like me, who have a strong, engrained aversion to writing in books, do when faced with a beautifully published cookbook—like Star Wars: Galaxy’s Edge: The Official Black Spire Outpost Cookbook with its pretty, glossy pages, which I’ve written about here on Twin Cities Geek—that needs a few alterations? There are tactics we can employ to help preserve the pristine pages of our cookbooks while still getting all the benefits of adding annotations.

It doesn’t take much to start annotating, and the materials are all fairly cheap, too.
1. Compile before Annotating
There are many times when I make changes to recipes on the fly, and iteratively. Because I’m making changes on top of changes and not always seeing the results until the very end of the cooking process, it makes more sense to me to write down the changes I’m making on scrap paper before actually writing in the cookbook. That way, I can make sure the notes I’m adding to the book’s recipe are accurate and represent what I actually ended up doing. This is best illustrated by the example of changing baking times. How many times have you baked something and had to put it back in the oven for another five minutes … and then another five … and maybe a couple more? Keeping track of the added time on scrap paper means that when you go to annotate the recipe, you can just write the actual full time you ended up baking the dish for, keeping your annotations clean and clear.

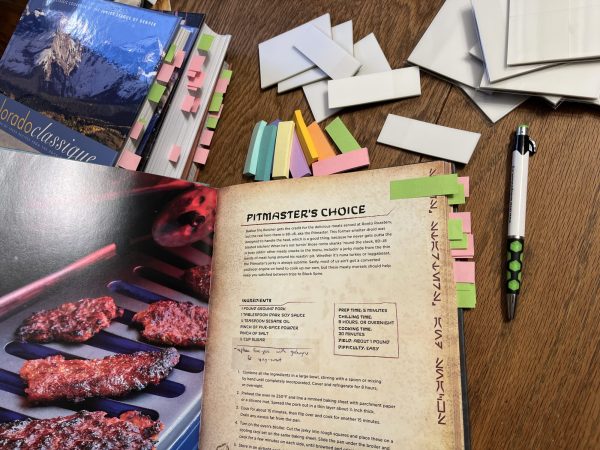
The transparent sticky notes are a little bit opaque, but when stuck on the page, you can still read the text beneath them.
2. Use Transparent Sticky Notes
I can thank book vloggers for this one. It’s kind of a game-changer, and I never would have thought to look for it if the YouTube algorithm hadn’t randomly decided I needed to watch an hourlong video about annotating novels (okay, it’s okay—calming breaths). For some reason, I decided to watch the video, and I could see at once how useful these transparent sticky notes could be for cookbooks. They are exactly what it says on the tin: clear vellum with a strip of adhesive along one edge like a Post-it. Because they are (mostly) transparent, you can stick them to a page and still read the text underneath, which lets you write and highlight without permanently marking the page!
This gives you a lot of flexibility. You can still easily see the original recipe if you decide to go back to it. If you end up making more changes, you can replace the sticky notes with new ones. And if you ever decide to donate or sell the cookbook, you can ensure that whoever picks it up can start with a clean slate to make their own modifications. The only downside to these is that you have to be careful what kind of pen you use on them. I’ve found that a plain old ballpoint is best; everything else smears.

Ballpoint pens work best with transparent sticky notes. Pilot gel pens and Micron fine liners smeared pretty bad when I tried them. The fine Sharpie smeared a little but could be a good second choice if you are patient enough to let it dry completely.
3. Flag Your Pages
Sometimes I have trouble remembering what cookbook I got a particular recipe from and end up taking half an hour to scour through my cookbooks’ indexes (I might have too many cookbooks) to find it. Flagging the recipes that I’ve made from each book is one way to help with this problem. I like to use the method of using different colored flags to indicate different things, such as green flags for recipes I’ve tried and would make again, pink flags for recipes I want to try in the future, and yellow flags for recipes I’ve tried and did not like—another tip borrowed from book vloggers. I could even add in another color to mark favorite recipes, or to note which recipes are vegetarian, gluten free, and so on.
The cookbooks I got from my mother have some recipes marked with “good” in pen in the corner of the page, but these marks are obviously not visible when the book is closed; I still have to find the recipe in the first place. Having the page flags poking out lets me immediately turn to good recipes, narrowing down my search when I’m looking for something to make. Being able to glance at a cookbook and know how much you have used or would use it is also helpful when the bookcase gets to critical mass and you need to slim down your library. Books with very few flags become prime targets for getting the axe.
While I am a lot better about annotating cookbooks than other books, I do really appreciate the ability to modify the recipes in a way that isn’t permanent and keeps the pages as clean as possible. These are the three best tactics I have found to help in that endeavor. I hope they help you, too!